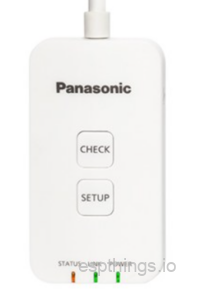
ESPHome Panasonic Climate WiFi interface
Table of Contents
Getting the Panasonic Climate control off the cloud
A little while back I came across a custom esphome component for a esp32 or esp8266 based airconditioning/Climate Wifi interface. A great way to get your Panasonic Climate control off the Panasonic Comfort Cloud and into Home Assistant locally. The horrible Panasonic app and ever failing cloud service had been bothering me for a while now.
How does it work?
Panasonic Climate units are usually connected to Panasonics Comfort Cloud using either a DSNK-P11 or a CZ-TACG1 WiFi interface.
 CZ-TACG1 |
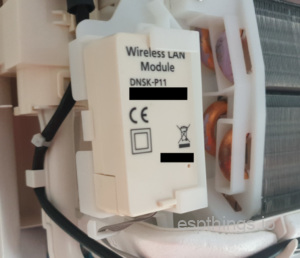 DNSK-P11 |
If you have one of these interfaces installed, you are unfortunate enough to be using the Panasonic Cloud service which sucks! Repeatedly having to log-in to your app and not not being able to control your Climate unit due to Cloud service outages are common issues. If you do not have one of these interfaces installed, you are likely not able to control your Climate units by anything else then the standard remote control that comes with the unit.
The Solution:
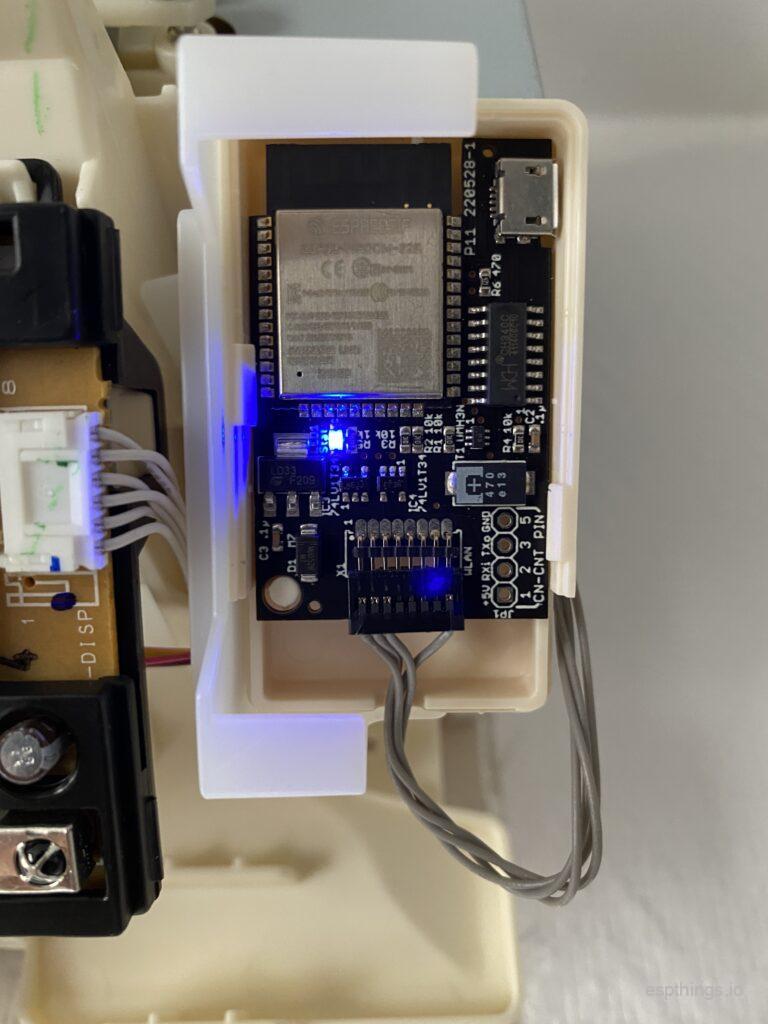
There is a solution to both problems. By using a custom esphome module it is possible to connect your Panasonic Climate Unit to Home Assistant locally. Remote controlling your Climate unit will be instant and no longer cloud dependant. The only thing missing was a drop-in hardware replacement for the original Panasonic DNSK-P11 Wifi-interface so Paul and I started measuring and fiddling around until we came up with this design:
Paul really did a great job on this PCB!
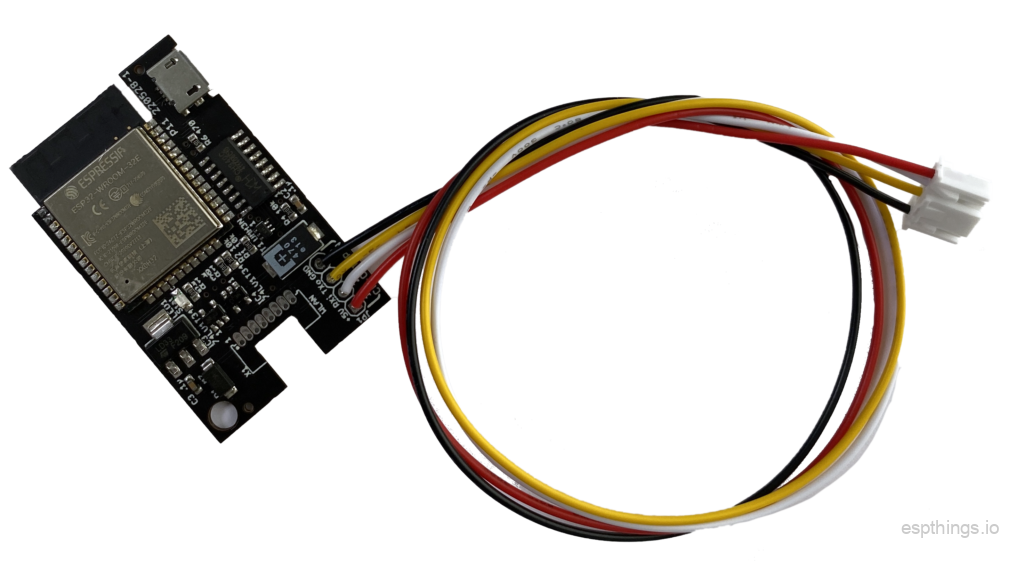
Panasonic Climate Interface with optional CN-CNT cable (no p11 header)
Espthings Panasonic Climate Interface with DNSK-p11 header
Usually we design PCBs with through-hole technology, but since that would not fit within the small footprint of the original PCB’s we had to design this one with SMD components. We will NOT publish the PCB source files as these files tend to end-up in the hands of people who commercially exploit them.
Features:
- 100% drop in replacement for the original DNSK-P11 PCB and a perfect fit for the original enclosure!
- ESP32, so you can also use BLE for location tracking of your phones etc.
- Status LED
- Fits the original Panasonic connector, no soldering, wire cutting or splicing required!
- Option to connect to a CN-CNT connector using a custom cable.
- Micro-USB terminal for installing the firmware (USB chip for auto-programming)
- Pre-programmed with a default esphome configuration with Hotspot, captive portal and web server enabled, so you can upload your own config OTA!
- Option to print or order a great tiny 3D-printable enclosure that exposes the P11 port, CN-CNT wires and USB-port.
- Fully tested
You want one?
UPDATE 3rd of september 2023:
We have a DIY version available now. More information at https://espthings.io/p11
Panasonic DNSK-P11 replacement:
Option 1. The price will be EURO 25,00 for the version that replaces the original Panasonic DNSK-P11 wifi adapter. It has the custom header for the original Panasonic DNSK-P11 cable installed (soldered).
Panasonic CN-CNT version:
There are a few options if you need it to replace the original CZ-TACG1 or if you have no Panasonic Wifi module installed at all. Please first check if your Panasonic Climate control has the CN-CNT connector!
Enclosure:
The .stl is available [ here ] so you can print it yourself as well!
Shipping:
How to buy or reserve one:
If you would like to buy or reserve one or more espthings Wifi interfaces, please use the contact form and state:
Amount/option(s).Full nameFull postal addressIf located outside of the Netherlands, your (mobile) phone number as we are required to to enter that for shippingThe exact preferred shipping method (check above!)
Please save your technical questions for the comments section of this post. Do not use the contact form for that please!
Instructions:
Hardware:
DNSK-P11 replacement:

Original DNSK-P11 enclosure
Our module inside 😉
Below a video on how to install the original CZ-TACG1 interface. The interface is different, but you’ll find clear instructions on how to open and close the unit. After taking off the enclosure, check your Climate unit for the DNSK-P11 enclosure.

Please subscribe to our YouTube channel and hit the bell to never miss a (esp)thing!
Take the DNSK-P11 pcb out of the enclosure carefully, remove the black connector from the PCB and install your espthings P11 interface. Connect the interface using the original DNSK-P11 cable. The connector-lip needs to go downwords in the notch of the PCB, the flat part of the connector up.
Please be careful as the pins are tiny. If you use your brain in stead of brute force, you’ll be ok. 🙂
CZ-TACG1 replacement:
You can eiher replace the original CZ-TACG1interface, or if you have no Wifi interface installed yet and your Panasonic unit has the 5-pin CN-CNT connector, you are good to install the espthings.io Wifi interface.

CN-CNT connector
Below a video on how to install the original CZ-TACG1 interface. The installation of the espthings interface with the cable (option 5), is pretty straight forward.
Please subscribe to our YouTube channel and hit the bell to never miss a (esp)thing!
Software
Each interface has been tested and is pre-flashed with esphome firmware, with the Hotspot, Captive Portal and webserver enabled, so you can install your own esphome configuration (or any other compatible firmware) using OTA (WiFi).
Just connect to the Panasonic Climate Hotspot WiFi network, use password qwe12345 and access the web-interface by entering the IP -address or hostname of the interface in your webbrowser.
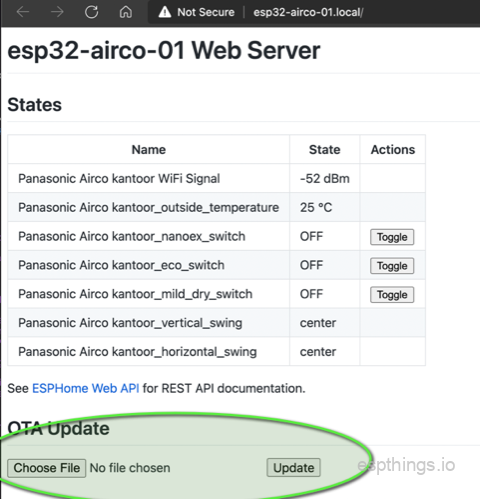
In esphome, create your own new configuration, press install, select “manual download”, download and save the file and upload that file in the web-interface of the interface (refer to the screenshot above). Power cycle the interface and it will then appear as “online” in the esphome dashboard.
>> Only needed for the old version: If you need to flash using USB for some reason, do not forget to close the jumper when booting the ESP32.
Config:
Please mind that we supply all modules with a basic test configuration which is the same for every single module. If you use more then one module in the same network, you need to reconfigure your modules with a unique (host)name! (substitutions: devicename: XXXX) and unique entity names (substitutions: long_devicename: Climate living)
More on the basic usage of esphome in this video:
https://youtu.be/yMhC6Or0oTY?t=170
ESPHome secrets:
esphome_wifi_ssid: 'yourssid'
esphome_wifi_password: 'yourpass'
esphome_ap_password: 'yourpass'
esphome_api_password: 'yourpass'
esphome_ota_password: 'yourpass'
Esphome module config:
substitutions:
  devicename: "pana-climate"
  long_devicename: "ESPthings Panasonic Climate Interface"
  pcb_version: "220722-1"

esphome:
  name: "${devicename}"
  name_add_mac_suffix: false ## if 'false' use different names/hostnames for each device!
  comment: "${long_devicename} ${pcb_version}"
  platform: ESP32
  board: mhetesp32minikit
  project:
    name: "esphome.pana-climate"
    version: "${pcb_version}"

external_components:
  source: github://DomiStyle/esphome-panasonic-ac
  components: [panasonic_ac]

wifi:
  ssid: !secret esphome_wifi_ssid
  password: !secret esphome_wifi_password
  ap:
    ssid: "${devicename} Hotspot"
    password: qwe12345

captive_portal:

web_server:
  port: 80

logger:
  level: DEBUG

api:
## uncomment the line below if you wish to use an api-password
# password: !secret esphome_api_password

ota:
## uncomment the line below if you wish to use an ota-password
# password: !secret esphome_ota_password

uart:
  tx_pin: GPIO17
  rx_pin: GPIO16
  id: ac_uart
  baud_rate: 9600
  parity: EVEN

## revisions below 220722-01 use GPIO12
status_led:
  pin: GPIO13

## For revisions from 220722-01 and higer the optional temperature sensor is available.
## DS18B20 1-wire Temperature Sensor
#dallas:
#  - pin: GPIO18
#sensor:
#  - platform: dallas
#    # Check the dallas sensor address in the log file
#    # For more info: https://esphome.io/components/sensor/dallas.html
#    address: 0x540000001524be28
#    name: "$long_devicename Temperature"
#    id: temp

switch:
  - platform: restart
    name: "$long_devicename Restart"

climate:
  - platform: panasonic_ac
    type: cnt   # For CZ-TACG1 use type: cnt / For DNSK-P11 use type: wlan
    name: "${long_devicename}"
    vertical_swing_select:
      name: "${long_devicename} Vertical Swing Mode"
    outside_temperature:
      name: "${long_devicename} Outside Temperature"
## If the ac does not report a current temperature (CZ-TACG1 only) uncomment
## the line below and point to the appropriate sensor
#
#   current_temperature_sensor: temp
#
## Since Panasonic ACs support different features you can comment out the lines below if applicable:
#
#   eco_switch:
#     name: Panasonic AC Eco Switch
#   nanoex_switch:
#     name: Panasonic AC NanoeX Switch
#   mild_dry_switch:
#     name: Panasonic AC Mild Dry Switch
#   econavi_switch:
#     name: Econavi switch
#   current_power_consumption:
#     name: Panasonic AC Power Consumption
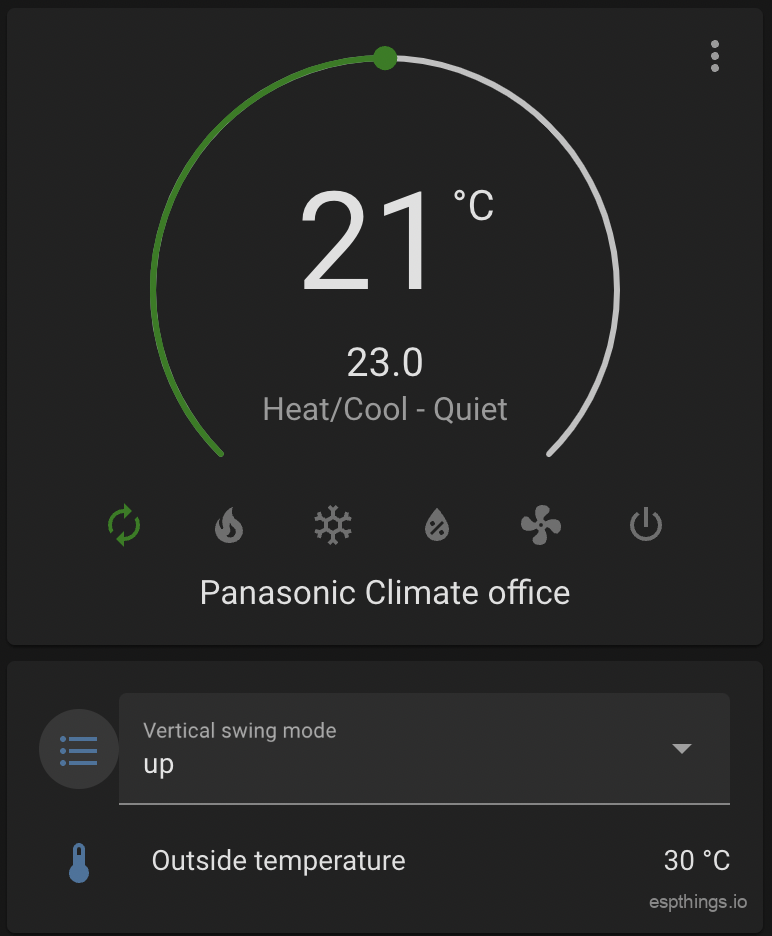
Home Assistant Lovelace yaml example:
type: vertical-stack
cards:
- type: thermostat
entity: climate.panasonic_climate_xx
- type: entities
entities:
- entity: select.panasonic_climate_xx_vertical_swing_mode
- entity: sensor.panasonic_climate_xx_outside_temperature
End result 🙂
Please subscribe to our newsletter!

Hallo AceIndy,
We hebben er inderdaad nog maar 2. Als je even contact opneemt via het contactformulier, kunnen we de eventuele mogelijkheden bekijken.
No, It can’t, sorry.
I believe it will also work for CZ-TACG1. Dominik’s repo also supports it, the correct wiring to the AC connector needs to to arranged of course. Michel what’s the status on stock and new batches? 🙂
Not in yet. Shipping is slow.
I need this in my life!
Will you be making more of these in the future?
Yes, the second batch is just in. We will be making more, but only after a certain amount of reservations are in so waiting times could be up to 2-3 months.
Hi,
is it possible to send:receive commands via MQTT?
https://esphome.io/components/mqtt.html?highlight=mqtt
Werkt deze ook voor saunier duval/bulex ? deze hebben gelijkaardige wifi interface
I wouldn’t know as I am not familiar with that brand of climate control, sorry.
Sorry if this is a stupid question, but what if your Panasonic AC unit has both the DNSK-P11 Wifi Module installed AND the CN-CNT connector on the PCB ? I see this in the HZ35XKE and the NZ35VKE units I’m currently looking at. Heck they also have the CN-WLAN connector … I think I’d be looking for Option 5 (or possible Option 3 even if it doesn’t make so much sense :D). Is there a space BOTH for the DNSK-P11 and your ESPHome module inside of the above mentioned AC units ? Thanks :).
That works. If you have the original DNSK-P11 and the espthings interface, you can use them both. 🙂
We are not familiar with every single Panasonic AC unit, but I have not seen any unit so far, that did not have some space to put our 3D-printable enclosure.
Thank you for your reply, Michel. Therefore, in this case, what option would you reccomend 🙂 ?
I would choose option 5 and either buy or print the enclosure.
Perfect, thanks. Yes, I was of course looking to buy the enclosure as well :). Hope that helps support your project 😉
Thank you. Much appreciated!
I have a Panasonic TZ series: https://www.logicool-ac.com/wp-content/uploads/2020/03/CS-TZ-WKEW-Service-Manual.pdf
The Wifi is built in, and it has the reference ACXA73-28520 and connected to CN-WLAN.
I do see in the PDF it has a CN-CNT port. However I have no clue if this is compatible, and if I should remove the existing wifi module?
That looks like the DNSK-p11 module. If you also have the CN-CNT you have the option to connect it both ways (depending on the espthings module option you choose) and you may also leave the original module in and connect a espthings module at the same time.
This information is all at your own discretion, because I do not have any option to test it on your specific model.
Found input from a Z series, similar idea: https://github.com/DomiStyle/esphome-panasonic-ac/issues/32
So indeed seems to work both ways. I guess for a drop-in replacement/addon option 5 is the easiest, correct? Just plug it in and run ESPHome to install.
Forgot to check the readme: https://github.com/DomiStyle/esphome-panasonic-ac
So indeed, I’m confident it will work. If you can confirm that option 5 is the easiest I will follow up on email for an order 🙂 Thanks!
They are both easy 😉
I have 6 Panasonic Fancoil PAW-FC2A-K009IR. I removed the cover to inspect the connectors, and only found two 4 pin connectors which are referred to as CN-Module and also 5 pins without connector in the middle just referred to as CN14. any idea if this would work with it?
https://share.icloud.com/photos/0a5VxSaUdPrkd2FOtccFqczpA
https://share.icloud.com/photos/0fd28Vyq8aYYQH8Djh6TqzryQ
That doesn’t look like anything I have seen before.
One thing I see the module is 5V and this shows 12V on the module connector.
Like I said, it does not look like anything I have seen before. You could try asking here: https://github.com/DomiStyle/esphome-panasonic-ac/issues
Hi Michel,
just recieved my modules and heve one installed but it does not generate the correct hotspot (pana-climate Hotspot in stead of esp32-airc-xx) and teh above mentioned password does not work.
did you change the default config? and if so what is the new password?
on this page should be correct:
ssid: "${devicename} Hotspot" <== devicename = pana-climatepassword: qwe12345tnx that worked indeed.
now i need to deal with home assistant giving me head ache, it will only detect entities from the most recently added device… 🙁 so they work when added but once i add a 2nd and 3rd the first ones stop working.
ow well, somethign for tomorrow to figure out.
Hi, please check our post carefully as you need to give all devices a unique name. We send them all with a base config so you can OTA upload your own configuration file.
So:
substitutions:devicename: "pana-climate-01"
substitutions:devicename: "pana-climate-02"
What you can do best now is:
1. Delete all devices from Home Assistant and restart.
2. Create all devices in esphome, with their own respective unique name: (or substitution) in the config
3. do a manual install in esphome and download the .bin files for all devices
4. Connect to the IP-address of each device and upload the corresponding config.
5. Add your newly discovered devices to home assistant.
etc..
If you are not that savvy with esphome, check our previous video for basic instructions: https://youtu.be/yMhC6Or0oTY?t=172
It installed well for two devices. The wifi name and password mentioned in the text are incorrect, you can get them from the .yaml file as mentioned in the comment above.
Plugging in (version 5) was very very easy. I now have them running in HA.
– First add them using USB and install your variant of the software.
I now only need to figure out the swing modes, they are not in line with my panasonic module, but that is software I guess.
Hi, you are absolutely right. I did not see the old password in the post. The yaml is indeed correct. I have corrected the post.
For swing mode you need to use a separate entity. My lovelace yaml:
type: vertical-stackcards:
- type: thermostat
entity: climate.panasonic_climate_xx
- type: entities
entities:
- entity: select.panasonic_climate_xx_vertical_swing_mode
- entity: sensor.panasonic_climate_xx_outside_temperature
The post just to confirm the quality of the product and how it works.
Installed about 1 week ago and so far I have used 2 modules without any problems, very easy installation and setup.
Any command is received practically instantly and without any problems.
Great job!
Thanks Stefano, always nice to hear!
It’s all true, wonderfull project. Only mode it seems not to work in my setting is ‘fun-only’. In your?
That fully depends on your panasonic model. If it does not support fan-only on your remote, it won’t in esphome.
ok thanks. In my remote there’re another’s setting, like speed-fun, is it possible to add in esphome?
If not available in software yet, you need to apply for a feature request here: https://github.com/DomiStyle/esphome-panasonic-ac/issues
Hello! Is there easy conversion to wifi -> Modbus TCIP? Is the interface of panasonic regular RS232?
I am building my bms/scada system where i can use opc, modbus rtu/tcip or using convert 232 to 485.
The interface uses serial signalling at 5V (TTL Level). The software is an esphome application. So if you can write a custom component which includes the translation from modbus to the command set of the ac unit, and get that to work in esphome, or any other environment which supports the ESP32 controller, you can do it.
We will not support that application. We will just support the hardware side….
Hi Michel,
Thanks again for the quick service!
As you mentioned it works like a charm..
one tiny thing. When i’m viewing the logs in esphome it throws a warning.
[W][panasonic_ac.cz_tacg1:462]: Received unknown mild dry value
I’m not quit sure.
Could it be you have this config option enabled?
    # mild_dry_switch:

    #   name: Mild Dry
Only enable options your unit actually supports.
Or maybe your unit supports it and you have it disabled 😉
You are right. it is the latter one.
enabled the option in the yaml and toggled it on/off in the ui.
Hi,
maybe I’m missing something here:
I have six Panasonic air conditioners with the DNSK-P11 WiFi module.
I already have the ESPthings modules and am exchanging them for the original ones.
I think I followed the instructions here exactly and assigned unique names to the individual modules in their ESPHome Config.
Unfortunately, I always see the same name for the entities in HomeAssistant:
ESPthing’s Panasonic Climate Interface
Shouldn’t they be different, as defined in the ESPHome Config?
The first device works perfectly, from the second there is of course a name conflict.
Unfortunately I can’t get any further, please give me a hint…
Many Thanks
Regards
Herbi
Two different Configs for example:
“kueche” works, “Wozi” not.
Please post your entire config of both modules
Use something like https://pastebin.com if you are not comfortable with using code tags.
The second, working config (the first installed):
(I will learn about the usage of pastebin… 😉
In order to help, I really need the full config, I can’t see what names you used for the Home Assistant entities like this.
1st and working Config:
substitutions:
devicename: “esp32-ac-kueche”
long_devicename: “AC Küche”
esphome:
name: “${devicename}”
name_add_mac_suffix: false ## use different names/hostnames for each device!
comment: ${long_devicename}
platform: ESP32
board: mhetesp32minikit
project:
name: esphome.pana-climate
version: “220528-1”
external_components:
source: github://DomiStyle/esphome-panasonic-ac
components: [panasonic_ac]
wifi:
ssid: !secret esphome_wifi_ssid
password: !secret esphome_wifi_password
ap:
ssid: “${devicename} Fallback Hotspot”
password: qwe12345
captive_portal:
web_server:
port: 80
logger:
level: DEBUG
api:
ota:
uart:
tx_pin: GPIO17
rx_pin: GPIO16
id: ac_uart
baud_rate: 9600
parity: EVEN
status_led:
pin: GPIO12
climate:
– platform: panasonic_ac
type: wlan # For CZ-TACG1 use type: cnt / For DNSK-P11 use type: wlan
name: “${long_devicename}”
vertical_swing_select:
name: “${long_devicename} Vertical Swing Mode”
horizontal_swing_select:
name: “${long_devicename} Horizontal Swing Mode”
nanoex_switch:
name: “${long_devicename} NanoeX Switch”
outside_temperature:
name: “${long_devicename} Outside Temperature”
2nd Config, not working:
substitutions:
devicename: “ac-wozi”
long_devicename: “AC Wohnzimmer”
esphome:
name: “${devicename}”
name_add_mac_suffix: false ## use different names/hostnames for each device!
comment: ${long_devicename}
platform: ESP32
board: mhetesp32minikit
project:
name: esphome.pana-climate
version: “220528-1”
external_components:
source: github://DomiStyle/esphome-panasonic-ac
components: [panasonic_ac]
wifi:
ssid: !secret esphome_wifi_ssid
password: !secret esphome_wifi_password
ap:
ssid: “${devicename} Fallback Hotspot”
password: qwe12345
captive_portal:
web_server:
port: 80
logger:
level: DEBUG
api:
ota:
uart:
tx_pin: GPIO17
rx_pin: GPIO16
id: ac_uart
baud_rate: 9600
parity: EVEN
status_led:
pin: GPIO12
climate:
– platform: panasonic_ac
type: wlan # For CZ-TACG1 use type: cnt / For DNSK-P11 use type: wlan
name: “${long_devicename}”
vertical_swing_select:
name: “${long_devicename} Vertical Swing Mode”
horizontal_swing_select:
name: “${long_devicename} Horizontal Swing Mode”
nanoex_switch:
name: “${long_devicename} NanoeX Switch”
outside_temperature:
name: “${long_devicename} Outside Temperature”
Did you actually install (program) these configs? What does the log in esphome say, from bootup on?
Pro-tip: Use the ‘code‘ button in the editor of this message-editor and paste your code between the tags. Makes it more readable.
I do not see any errors in your config. You might have tried the module before and your issues might now be within Home Assistant and not within esphome. Try removing both devices from HA, restart HA and then add them again, one by one.
If that does not work you need to tell us more about the exact issues, because it’s unclear what you are exactly experiencing.
I knew it must have been something ‘stupid’ like that as your configs where correct, but your hostname was not corresponding to that config. Great it works now. Enjoy!
I have a Panasonic CZ-TACG1. On the CN-CNT connector it has wires on pints 2, 3, 4, and 5. In the photo of your device (above) you have wires on pins 1, 3, 4, 5. What is the difference? Is this because the CZ-TACG1 uses a 12v power source and your device uses 5v?
I highly doubt yours is in fact a regular CZ-TACG1 interface as those have 5 wires, also providing 5v which our interface needs. https://github.com/DomiStyle/esphome-panasonic-ac/blob/master/README.CZTACG1.md
I’m not sure what you mean. Are you saying that my CZ-TACG1 doesn’t have a regular CZ-TACG1 interface? I’ve attached a photo showing red (power?) next to the black instead of at the opposite end.
I suspect the aircon provides both 5v and 12v, and my CZ-TACG1 uses the 12v, but your device can use the 5v. When I finish work today, I will test the voltage on the aircon to confirm that both voltage levels are present.
I think I misread. If your aircon has a regular CN-CNT interface, you should be good. There will be both 5v and 12v, of which we use the 5v.
Right, that makes sense. And yes, I was able to confirm that both 5v and 12v are present on my aircon, and that only the 12v line is wired on the CZ-TACG1’s cable/plug (red wire, pin 4).
So as long as I connect the ESP32 wifi interface module’s red wire to pin 1 instead of pin 4, everything else stays the same, and it’ll all work.
Thanks for setting my mind at ease!
Hi Michel,
I just received my first module, i flashed it with my firmware and it works perfectly.
Now i can control my ac with the original and with your module.I control the ac with GET and POST commands perfectly. You made my day, thank you !!. Now i have to figure out UDP.
Hi Filip,
Great to hear that your somewhat different approach works as desired!
Have fun with your cloudless solution 😉
Do you know if this is compatible with the CZ-CAPWFC1 I believe from this https://github.com/DomiStyle/esphome-panasonic-ac/issues/26 that it is a DNSK-P11 inside this module.
I would love to get a local version of this working.
I’m afraid there is no progress on that yet: https://github.com/DomiStyle/esphome-panasonic-ac/issues/63
Hi,
It says; Possibility to connect a DS18B20 . Can you register the room temperature with this and switch the device on/off in accordance with the temperature measured in the DS18B20 ? (So heat pump flaps closed?)
EDIT: Michel: I translated your question this time so other people will be able to read it as well. Please use English on an English website 😉
Well, yes that would be possible. You could use the automations within ESPHome, or just automate that from Home Assistant as you can expose this sensor to Home Assistant.
Hello,
ok i will order one. So i only have to order DS18B20 and option 4?
thx
Hi Nicolas,
Please read the instructions for ordering. You will have to get the DS18B20 elsewhere. We are not selling those.
Hi. I received my device last Friday, printed a case, uploaded new firmware, connected it to my wifi, powered off my aircon, and plugged the device in to the header for the CZ-TACG1 interface. Once power was restored to the aircon, the device appeared on my wifi, showed up in Home Assistant, and all seemed to be working perfectly.
Overall, I’m really quite pleased, so thankyou very much for your work on this. However, I have a couple of issues I’m hoping someone can advise me on.
Firstly, the current temperature (as displayed on the web interface) seems to fluctuate from about 21C to 29C and back again, around once per 10 minutes.
I note that the ESPhome yaml you provided has an entry for current_temperature_sensor commented out:
with a note to uncomment if the current temperature doesn’t show up. The current temperature IS showing up, so I don’t think I should uncomment. It’s just that the temp is wrong, and not even stable. Is there something wrong with my device or my aircon that the temperature if fluctuating like that? Or a change to the code I can implement to fix this? Debugging options to help diagnose?
The second issue is that there is no entity for current temperature. On the official CZ-TACG1 device connected to Home Assistant using the Comfort Cloud integration, the current temperature shows as an entity. I’m not sure if your board is providing feature-parity with the Panasonic alternative, and there’s something wrong, or if I have to setup a sensor myself, to get its value from the current_temperature attribute.
I’d be grateful for any help you can offer.
The temperature is read directly from the AC, so any incorrect measurements should come directly from the AC. We have noticed the current temperature measurement from the AC can be pretty bad when the AC is running.
This temperature is no separate entity, it’s displayed within the climate component (currently: XX)
The current_temperature_sensor: parameter can be used for an external temperature sensor, for example a sensor which is already available in Home Assistant, like a zigbee aqara temperature sensor, or something like that.
When configured, this sensor will overrule the internal sensor.
sensor:- platform: homeassistant
id: current_temperature
entity_id: sensor.temperature_living #home assistant entity here
attribute: current_temperature
then
current_temperature_sensor: current_temperatureMore on that here: https://github.com/DomiStyle/esphome-panasonic-ac
Thanks for your answer Michel. I think the problem is fixed, so just for closure, and to help anyone else with the same symptoms:
Last night, the ESPthings module stopped responding on the network. The aircon continued to work, but I couldn’t ping the module’s static IP. This morning, rather than disassemble the aircon to reset the module, I just turned the aircon off and on at the mains switch.
Since power cycling, everything is working again. And as a bonus, the “current temperature” had settled down and is now oscillating by a 1C margin around the set temperature. So the problem I had is now fixed!
The attached image shows a graph of the temp being reported by the aircon, with the wild fluctuations before the outage, then settling to normal afterwards.
I’m still a bit concerned that the ESP module stopped responding. This could just be my wifi network (I have a lot of devices and I might be pushing the limit of my mesh wifi system).
I would not worry too much about the module being at fault. We test every single one of them before shipping and this would be the first 😉
What does overruling exactly mean? I primarily want to use my Panasonic for heating. Since my unit is close to the ceiling the temperature around the airco quickly goes up, after which the unit goes idle. After the air is mixed again it starts again. I would rather have the unit itself use an external temperature meter and continue for longer runs. The CZ-RTC5B can do this.
https://youtu.be/HlKa3Lb_0fI?t=77
or is it just that it will report the temperature back so it looks nicer in Home assistant?
Personally I do not use this:
# Useful when the ac does not report a current temperature (CZ-TACG1 only)
# current_temperature_sensor: temperature_sensor_id
So you might be better off asking the software dev. (Dominik)
Is there more details available on the temperature sensor option?
What would you like to know?
I plan to get 5 indoor units and I would like to use a temperatur reading from a room thermostat as the current room temperatur. I have seen that you also offer boards with an extern temp sensor using CN-CNT connection. Is there a way to transfer a value i.e. through MQTT to the board and use this value as tem sensor for the indoor unit?
Just dropping a message to say that this seems to work wonderfull. Setting up 2 modules was little tricky, I had to add manual ip to the yaml files in order to get things working properly.
Thanks for letting us know!
You should not have to configure IP’s manually. You need to use unique devicenames as outlined in our example config.
Hi Michel, I recently received my unit and once installed, works nicely. (CZ-TACG1)
I just wanted to ask about the entities available in HA for automation purposes. According to the Domi package, “The climate entity and all sensors and switches are now automatically exposed to Home Assistant” in the latest version.
If someone could give me some help about, would be appreciated. It’s my first experience with HA and all this science and still know a very little ..
Thank you very much for your work!
Hi Alfons. All entities that are exposed are to be found in HA either via HA menu -> Developer tools -> states (then use the search option) or:
HA menu -> settings -> Devices & Services -> ESPHome -> devicename -> click “1 device”
At https://www.home-assistant.io/docs/automation/ you will find all information about making automations.
All right….I’ve been searching but the fact is that I cannot find any entities published for the device. Probably I must be doing something wrong…. Thanks in advance
In that case remove the device(s) from HA, restart HA and then add it manually again as esphome device. After that check again.
Hi
On My heating pump I Can set 3 temperatures hot water, floor heating and general heating.
Is this supported?
I don’t think so.
Hello Michel,
I’m trying to update the interface via OTA but it’s failed. The error message is: Update failed. Wrong magic byte.
Any idea what I’m doing wrong.
I build the fw with homeassistant and your config from above. Just changed the name and long device_name
Thx
Alexander
Clean the build files, then do a manual install and choose ‘modern’ format.
Still the same failure
Then I suggest flashing it via USB. It’s impossible for me to see where it goes wrong in your setup without providing detailed information.
I have flashed another module with the same binary and I can update it OTA without issues.
Ok, I was able to flash with ESPHome CLI. It works well. Great job!
Is there a posibility to deactivate the led?
Turn it into a binary light.
Hi, i also would like to turn off the status led, but i am not sure how to turn it into a binary light.
Any detailed description on how to do this?
Thanks in advance.
This is all very well documented: Binary Light — ESPHome
Thanks!
For others that would like the recipe, change the .yaml file to this:
# revisions below 220722-01 use GPIO12
#status_led:
# pin: GPIO13
# Make a switch to turn off the status led
light:
– platform: binary
name: “Status led”
output: status_led_output
output:
– id: status_led_output
platform: gpio
pin: GPIO13
inverted: True
I had the same issue. Choosing legacy format solved it.
Hallo Michel, Ik heb de eerste module in werking. Mooi product!
Ik heb een aangepaste Esphome firmware erop gezet met mqtt ingeschakeld en de api uitgeschakeld. Ik krijg nu keurig de waarden van de AC unit in mqtt.
Wat ik alleen niet door hem / kan vinden is hoe commando’s naar de ac unit te sturen. Moet ik daarvoor zelf on_message topics configureren? Zo ja, zou je daarvan een voorbeeldje kunnen geven van instellen fansnelheid of zoiets? Of mij anders in de goede richting wijzen?
Alvast mijn dank.
Liever Engels de volgende keer, dan hebben andere mensen er ook nog iets aan 😉
Zelf gebruik ik gewoon de API in combinatie met HA, ik heb geen ervaring met MQTT in combinatie met dit project.
Hello,
i’ve received the module well. Was possible to connect to the ESPthngs Panasonic interface. After that, i was possible to choose my home network, fill in my password. But now he’s blinking green for a while. Can’t find him in Home Assistant app.
Can i do a factory reset?
thx
Is the module connected successfully to your (wifi) network and when you enter the IP-address of the module in your browser, do you see the esphome webinterface?
If we look in the browser, no esphome webinterface. I guess we used a wrong password.
If it does not successfully connect to wifi within 30 seconds, it will create an access point and you should be able to reconnect to that and set wifi again.
If not, you can flash the firmware to the device as outlined in the video. This does require some basic esphome knowledge.
Hi where to order this panasonic esp32 module for replace the CZ-TACG1 I use.
Please read the instructions on this page. Thank you.
Hi, this is just great stuff!
Have it up and running now and managed to make the indoor tempate sensor 🙂
2 questions:
-I cant see the NanoeX entity, is this setup as standard, or do i need to edit ESPconfig?
-How do i make the config file with ESPhome? Do i need some sort of editor?
Best regards Ed
1. Add the appropriate section to your esphome config as outlined here: https://github.com/DomiStyle/esphome-panasonic-ac/blob/master/ac.yaml.example
2. You need to take a look at our video:https://youtu.be/yMhC6Or0oTY?t=172 or/and checkout http://www.esphome.io
Hi there,
I am trying to compile the source code in ESPHome version 2022.3.1, which is installed in Home Assistant ver. 2022.9.6, Supervisor 2022.09.1 and Frontend 20220907.2 – latest.
I got board pcb_version: “220722-1”.
I used this source code. As a result, the compilation failed.
I wonder If I simply overlooked or ignored something. Thank you.
Michael
Hi Michael,
I just compiled your exact code without issues. I presume you are using the esphome SECRETS correctly?
I have no further clue as to where your compilation issues are cause by.
In secrets I have defined (it also normally complaining when there is no coresponding record) these records:
wifi_ssid:
wifi_password:
esphome_api_password:
esphome_ota_password:
I used option: Install/Manual Download/Modern Format
I’m sorry, but I have no clue as to what is your specific issue when compiling.
my compile of your file:Paste.ee – View paste bF3Jl
Hi Michel,
thank you for your reply and test. For others who might be in a similar situation, I uninstall ESPHome addon from my Home Assistant, install it again and I was able to compile code without any further changes. OTA uploaded firmware successfully.
There is one thing I am not sure why is happening, see the log. I could see quite a bit of [W] Warnings :
[19:39:53][W][panasonic_ac.cz_tacg1:259]: Dropping invalid packet (length)
[19:39:58][W][panasonic_ac.cz_tacg1:259]: Dropping invalid packet (length)
[19:40:03][W][panasonic_ac.cz_tacg1:259]: Dropping invalid packet (length)
[19:40:08][W][panasonic_ac.cz_tacg1:259]: Dropping invalid packet (length)
[19:40:13][W][panasonic_ac.cz_tacg1:259]: Dropping invalid packet (length)
[19:40:18][W][panasonic_ac.cz_tacg1:259]: Dropping invalid packet (length)
Should I be concerned? Thank you.
Hi Michel, just wanted to say a huge thank you for this project – I’ve had my CZ-TACG1 replacements for a few weeks now and after some fiddling around (my first time using ESPHome) they’ve been working flawlessly!
Thanks, that’s great to hear!
Hi Michel
First thank you for very fast delivery super, I have now tryed to get this to work and have panasonic online but only problem is that it say “This device has no entities”
maybe some tips what to do.
Regardes Kaj
Please tell us exactly what you have done since you received the module. I am not able to help you based on the scarce information you provided.
Hi Michel
I solved the mystery (missed in setup to put whole command line right, copy/paste but need to check after paste)
Thank you for a very useful item.
Hi!
This is exactly what I’m looking for and have just ordered a kit! When can you expect another batch with custome modules to arrive?
If it will take several months, would you consider to share only the circuit diagram so I can put together my own quick-and-dirty solution?
Ps.. This is really a great solution, why no sell it on eBay or Amazon!
Hi all,
thanks for the great work!
I have one question: How can I select the nanoex mode for the panasonic etherea indoor units? I cant find a nanoex modu in the esphome software.
Please read the documentation of the Panasonic module carefully as outlined in our previous e-mail.
It’s documented very clearly here:
https://github.com/DomiStyle/esphome-panasonic-ac
Since Panasonic ACs support different features you can comment out the lines at the bottom of your ac.yaml:# Enable as needed
# eco_switch:
# name: Panasonic AC Eco Switch
# nanoex_switch:
# name: Panasonic AC NanoeX Switch
# mild_dry_switch:
# name: Panasonic AC Mild Dry Switch
# econavi_switch:
# name: Econavi switch
# current_power_consumption:
# name: Panasonic AC Power Consumption
Been lovin this for awhile now. Works very well, thanks. However the current temperature reading is showing higher than it logically should. Is there a way to add negative offset of 2 degrees somehow?
Not as far as I know. Even if you would offset it by 2 degrees in esphome, which is possible, it would just be optically and not change anything.
I know. the AC unit and your ESP unit is as should but ONLY the reading is somehow showing higher than it should… so… can you tell me if there is a documentation somewhere or something?
Thanks
You could create a template sensor in esphome that corrects the value and use that sensor in stead as documented.
Hi Michel
I’m reading all the possible documents, but I don’t understand if the panasonic Etherea Series CS-Z25XKEW unit can be compatible with ESPhome.
https://www.manualslib.com/manual/2018110/Panasonic-Cs-Z20xkew.html?page=1#manual
Do you have any idea if I will be able to make it work locally with your project.
Or do you have to suggest a panasonic model that is definitely compatible?
thanks for the reply.
This unit seems to have the CN-CNT connector and the wifi module seems to be DNSK-p11, so I would say it’s compatible.
Thank you so much, waiting patiently for the next esphome batch production.
Sincerely happy new year!
Hi Michel,
I received my Panasonic Etherea Series CS-Z25 and you were right, this unit has the CN-CNT.
I have to disassemble the built-in wifi module (which I don’t see, it will be below) https://nextcalz.duckdns.org:444/s/sbPpgpPdjcP2DdJ
or, can I just connect the ESPhome to the CN-CNT connector and that’s it?
Thanks
You need to take the cover off ant then you will find it. You can also have both connected, That should work as well. I would take the Panasonic module out anyway.
Ciao Daniele,
I’ve a CS-Z25VKEW, and the DNSK-P11 replacement is not working. I suggest you to connect the module with the CN-CNT connector such that you don’t even have to dismount all the air condition.
In that case, as Michel was suggesting, you can leave the original DNSK-P11 connected and keep the Panasonic cloud working.
Thank you Filippo for your experience, I reed your posts. Michel says to remove the original module anyway. My Panasonic model is CS-Z25(X)KEW, I don’t know what is the difference between X and V. Anyway I try to get to the module if it’s not too hard.
Happy New Year.
That is not what I am saying 😉
I said that I would take the original wifi module out, as the esphome module does the same thing but better 😉
ah ok, if i don’t remove the original module there is no conflict, the esphome module will work without problem. perfect so I don’t damage, thanks so much.
Hi Michel, thank you very much for your project.
Unfortunately I’m having a few troubles.
I got a DNSK-P11 replacement and I flashed it through USB with the ESPHome Add-on for HomeAssistant.
When connecting it to the aircondition unit, I inverted the polarity of the connector. I turned it on, and I noticed it was inverted. So I swaped it.
Now the device can connect to the wifi, the signal is strong, I can open the webinterface, I can see the entities in HomeAssistant, but I don’t receive any feedback from the airconditon.
If I try to turn it on, or change the setpoint, it doesn’t do anything.
The “wifi” led on the aicondition unit is blinking, while with the original DNSK-P11 module it was always ON.
The aircondition is working correctly using the infrared remote.
In the device log it just keep posting, twice per second:
22:05:47 [W] [panasonic_ac.cz_tacg1:259] Dropping invalid packet (length)
and nothing else.
I tried to reflash it OTA a several times, and everytimes it says it flashed successfully, but the warnings keep coming out, and the device is still not working.
Any advice?
Maybe I burned something with the connector swapping?
Ai, how did you manage to do that? The connector has a notch and the PCB has a cutout for the notch. Without bending the pins you should not be able to invert the polarity.
I’m not really sure if inverting the connector would damage anything in this case. I would have to check.
Can you flash the exact same firmware you put in this unit in one of the other 3 I send you and test if that works? If that works this specific module is likely to be damaged by reverting the connector.
mmhhh, maybe I’m missing something: It’s very easy to invert the connector, and it fits quite well even without the notch.
[for people looking the comment: DO NOT CONNECT like this]
So, I will now take a new module.
I copy and paste your yaml configuration changing just these three things:
devicenamelong_devicenametype: wlan (instead of cnt)right?
I noticed the mistake of leaving “cnt” from my previous comment, now it is more verbous with more errors in the logs.
and after 19 retrials it says
Another info: duting the flashing I get just one warning that is
But a few lines before it says
So it should be able to resolve the IP address…
Thanksfor your patience
F.
[for people looking the comment: DO NOT CONNECT like this]
This warning is not really needed as we have a clear warning on our website:
ok, then if you can, delete my comment.
I did reinstall back the original DNSK-P11 module, and it works fine with the cloud. The “wifi” led on the aircondinitonin unit is steady on.
So I can exclude to have damaged the air condition.
I flashed a second module, and it’s still not working.
It doesn’t give me the warnings on the log though, so this could be a step forward.
But anything I do from the interface is just not applied by the airconditioning.
This is the configuration I used:
substitutions:
  devicename: "panasonic-ovest"
  long_devicename: "Climatizzatore Camera OVEST"
  pcb_version: "220722-1"

esphome:
  name: "${devicename}"
  name_add_mac_suffix: false ## if 'false' use different names/hostnames for each device!
  comment: "${long_devicename} ${pcb_version}"
  platform: ESP32
  board: mhetesp32minikit
  project:
    name: "esphome.pana-climate"
    version: "${pcb_version}"


external_components:
  source: github://DomiStyle/esphome-panasonic-ac
  components: [panasonic_ac]

wifi:
  ssid: !secret esphome_wifi_ssid
  password: !secret esphome_wifi_password
  ap:
    ssid: "${devicename} Hotspot"
    password: !secret esphome_ap_password

captive_portal:

web_server:
  port: 80

logger:
  level: DEBUG


api:


ota:


uart:
  tx_pin: GPIO17
  rx_pin: GPIO16
  id: ac_uart
  baud_rate: 9600
  parity: EVEN

## revisions below 220722-01 use GPIO12
status_led:
  pin: GPIO13

## For revisions from 220722-01 and higer the optional temperature sensor is available.
## DS18B20 1-wire Temperature Sensor
#dallas:
#  - pin: GPIO18
#sensor:
#  - platform: dallas
#    # Check the dallas sensor address in the log file
#    # For more info: https://esphome.io/components/sensor/dallas.html
#    address: 0x540000001524be28
#    name: "$long_devicename Temperature"
#    id: temp

switch:
  - platform: restart
    name: "$long_devicename Restart"

climate:
  - platform: panasonic_ac
    type: wlan   # For CZ-TACG1 use type: cnt / For DNSK-P11 use type: wlan
    name: "${long_devicename}"
    vertical_swing_select:
      name: "${long_devicename} Vertical Swing Mode"
    outside_temperature:
      name: "${long_devicename} Outside Temperature"
## If the ac does not report a current temperature (CZ-TACG1 only) uncomment
## the line below and point to the appropriate sensor
#
#   current_temperature_sensor: temp
#
## Since Panasonic ACs support different features you can comment out the lines below if applicable:
#
#   eco_switch:
#     name: Panasonic AC Eco Switch
#    nanoex_switch:
#      name: "${long_devicename} NanoeX Switch"
#   mild_dry_switch:
#     name: Panasonic AC Mild Dry Switch
#   econavi_switch:
#     name: Econavi switch
#    current_power_consumption:
#      name: "${long_devicename} Power Consumption"
Any Idea on what could I be missing?
I’m not even trying to control it with homeassistant, just with the webserver to check if the module is responding, and it doesn’t seem to.
This looks right to me. All 4 of your module work as we have tested them on a actual Panasonic unit, so I am not sure as to what is the problem in your specific case.
Hi Michel,
Today I tried to connect it to the CN-CNT connector, leaving the original DNSK-P11 module installed, and it’s now working!!
So, probably, as in the case of the CZ-CAPWFC1 that you mentioned in the comments, my model might have a different version of DNSK-P11, and could have some troubles in the handshake phase.
For future reference: I’ve a CS-Z25VKEW, with this model use the CN-CNT connector instead of the DNSK-P11 option.
Hi Michel,
I would love to get two of these, but it looks like I’ve just missed out based on last update.
Are you still taking reservations? Or is the an alternative way to manufacture, given the pcb source files won’t be released?
Cheers,
Dan.
You can make one yourself from an ESP32/ESP8266, a 5V/3.3V logic converter, a JST connector plug (or maybe just some single wires with female DuPont connectors) and some wires. I bought all the parts to do this, but decided I didn’t have the time to put it together, and the price to buy it ready to use was hard to argue. Here’s the info about making your own: https://github.com/DomiStyle/esphome-panasonic-ac
Very sad to hear that there will not be additional devices for sale. I would purchase another 8 units if there would be another lot to buy from.
I missed this message entirely. Better use the contact form for that.
I used my Panasonic wifi interface module for some time, and it worked just fine. However, after moving house I no longer need it, so I’m happy to sell it for the cost of postage from Australia. It’s in a 3D printed case and has the cable soldered to the board ready to connect to the aircon’s CN-CNT socket. Is anyone interested?
Hi Jez,
Yes I’m definitely interested!
I was lurking here and finally chose to have a panasonic AC compatible with CZ-TACG1 with the plan of buying this awesome interface module. My home has just finished renovation but it’s sad that Michel is not producing a new batch anymore. Now you’ll be my savior!
Please contact me at espthings@ks94.anonaddy.me (I’m willing to share my email address to you, just don’t want to make it public here so I’m using an AnonAddy alias)
Cheers,
Kenneth
Sold! I’ll email you soon Kenneth.
Hi Michel,
after months of trouble free function I had to switch off power at my home for some other reason.
Back on power one of my AC appeared after a few minutes in HA, but the other ESP (same model) seems not to boot. Even the fallback hotspot isn’t there.
Any hint what to do?
Thanks
Edward
Hard to say what happened. Take it out, connect to USB and check the logs from esphome. If it’s not booting try re-flashing the firmware.
Looks like a power supply problem.
With USB the ESP is booting instantly.
Only when powering on the AC mains the ESP hangs.
Plugging out an in the CN-CNT with AC main on also works. Seems to be a brown-out.
Any idea?
Cheers
Edward
Hi Edward,
The only thing I can imagine causing this, is the 470µF capacitor on the PCB. Not sure why after a power outage it failed, since it should be able to survive that for sure!
If you have a soldering iron and a capacitor of 470 – 1000µF (do not go much larger, since the voltage regulator might not like that during power up!) with a voltage rating of at least 6.3V (I would recommend up to 25V, due to physical size), you can try to solder that parallel over the capacitor. The 470µF capacitor is the large rectangular one next to the header connections. (Bottom right, with the ESP32 module upwards)
The positive of the capacitor needs to be towards the center of the PCB, and the negative towards the outside of the PCB.
Best thing to do would be trying to remove the old capacitor, but if that is not easy for you, you can start with leaving it in place.
If you run into issues, contact me at paul@espthings.io .
Thanks
Paul
Hoi Paul
Thanks for your answer, I’ll try. But first I excange the board between my two AC to check, if it is a problem with the AC power unit.
Edward
I have a recurring problem, especially when I do an ESP update, but sometimes out of the blue.
After flashing, I always get error messages like this (I copied these from a post above):
[D][panasonic_ac.dnskp11:721]: Resending previous packet
[D][panasonic_ac.dnskp11:280]: Dropping invalid packet (checksum)
[W][panasonic_ac.dnskp11:249]: Dropping invalid packet (header)
and after xx retrials
[E][component:113]: Component panasonic_ac.climate was marked as failed.
But: the message “Start in safe mode after xx attempts” (roughly speaking) gives me something to think about. Apparently the ESP then works in this “safe mode” and I have access again via the home assistant.
Maybe the error messages and this “Save Mode” have a connection?
Maybe you can change something in the code to enforce this “safe mode”? It seems to be working.
Thank you and best regards
Herbi
Check your config. You probably have an unsupported option in your climate config.
You need to make sure your Panasonic unit support all climate options you have activated, or deactivate them.
Hi,
I think there are no options active which are not supported. Just vertical_swing_select, horizontal_swing_select, nanoex_switch, outside_temperature.
Deactivating all of them made no change.
On DomiStyle’s Github site (esphome-panasonic-ac) I saw that there is an issue marked as bug concerning ESPHOME 2023.4.x – maybe this issue, or another change in the code could be the cause?
Thank you very much!
I have no issues with the current version of esphome.
I’m planning to connect DS18B20 temp sensor but I’m not sure where on the board to connect it to. Is there circuit diagram or PCB schematic and which is the recommended GPIO port to use that has a pin out on the board?
Thanks in advance!
If you have the right board (our recent version), it’s marked 3V3-DG-GND (which is 3,3V – DIGITAL_SIGNAL – GND)
GPIO is in the example config.
It’s pcb board revision 220722-1 so I guess it’s connected to GPIO18? Btw, do I need a pull-up resistor or is that fixed on the board as well?
Yes, no, yes.
Thank you so much and thumbs up for PCB v220722-1! 😀
Hi,
7x DNSK-P11 replacementmodules for sale 🙂
PM me if you’re interested.
Regards
Herbi
Hey herbi,
I would be interested in 4 esp modules if you would sell them individually and if any are still available!?
if you are interested please send me a message on m4rzza@gmail.com. thx
@Markus: Hi, I wrote you an email 😊
Maybe on a false address, i have nothing in my inbox!? maybe the dot behind .com 🙁
2nd try… 😉
Hi herbi,
do you still have some available? I am looking for 2 of them. You can reach me at ——-@———edit——
No, we don’t have anymore available. Sorry.
michel,
i know that you (the OP) dont have them anymore. However herbi said he still has some available (probably from a bulk order) – thats why i was saying “hi herbi” 🙂 Maybe he still has some leftover.
Btw, if you dont want to make more of these, why not opensource the gerber/bom? I see this on alot of esp projects and i cant think of any that have been commercially exploited.
There is a through hole component version that you can build yourself in the works.
Hi Herbi,
i would very much like to get two of these.
Do you still have them?
Please be so kind and contact me: schulteam-saeulen.05@icloud.com
Hi,
thank you for your interest, sorry that I can’t help you, I sold them all.
Regards
Herbi
Hi, sorry I sold them all.
Regards
Herbi
No problem, thank you!
Hopefully there will be another “plugin” replacement available in the future … 🙂
We are working on a very simple DIY (through hole) version which basically works for the esp32 (wemos d1 mini), but not 100% reliable for the esp8266 wemos d1 mini. We need some more time for that.
Hi Michael – any indication on when the next iteration of this will be available? I’ll be needing a DNSK-P11 replacement module soon! 🙂
No sorry, still no progress on the esp8266 issue with our new DIY design.
You probably already discussed it, but wouldn’t it be an option to drop the support for esp8266 on the DIY… I think many people (me included) would happily pay the extra for a esp32 to get something up and running. But maybe there is some pros with the esp8266 (other than the price) that I’m overlooking.
We could do that, but sadly the esp32 wemos d1 is wider and then would then not fit in the regular case.
I’ve only just found this site and would be very interested in fitting one of your units in each of my 5 aircon units in my house in Spain…
Please let me know as and when you have boards for sale again!
They won’t be on sales ever. It’s simply too much of a hassle to ship these all over the world.
We are working on a DIY version that will be free to build yourself with simple Through-Hole components.
Would be keen to see this also
Hi.
Who knows what models this device works for?
I have CS-BE35TKE. Will it work?
The CS-BE35TKE has an option for the CZ-TACG1 according to datasheet. So
this will very likely work on this unit.
Hi, since this device is currently not available anymore, I have ordered 5 units with this hardware https://github.com/jnicolson/panasonic_ac_wifi from jlcpcb.
I have flashed two of them, but waiting for some wiring to connect to the airco’s
I’ll allow this partly, as it’s a fine tip. I will however not allow for sale/wanna buy discussions on this medium, even if you are just intending to help others. This is not the place for that. Hope you understand.
[…] Back in August 2021 we published an article about an esphome component for a esp32 or esp8266 based airconditioning/Climate Wifi interface. A great way to get your Panasonic Climate control off the Panasonic Comfort Cloud and into Home Assistant locally. The only thing missing was a proper hardware solution, so we developed one and published the article here. […]
Hi Michel!
this is a great project!
Thanks for all the work you have done decoding the Panasonic communication protocol! This must have been a lot of work!
Since Panasonic is bothering me more and more with changing the app version again and again which always disrupts the connection to iobroker, i want to find a permanent solution.
Do you have some more information about the connectors built into the AC?
I want to leave the units as it (= no cutting/soldering the cables) is to be able to “rewind” ans simply take the PCB incl. connector out again. So i would appreciate some more information about the CN-CNT Connectors.
These look like some Molex or JST connectors, but they have millions of different models which also are sometimes not availlable by distris.
Could you help with that?
For the record: we only made the hardware and the respective config. The code is written by Dominik!
You will find the connector documentation linked on Dominik’s repo, but it”s also in our BOM 😉
Great, got it!
Thanks!!
Hi
Great project!
Is there a plans to extend compatibility with larger Panasonic units? Ducted, Cassette and under ceiling units. They are using different Wi-Fi adapter CZ-CAPWFC1. Connection to indoor unit PCB, to T10 connector and R1,R2(control panel)
https://www.aircon.panasonic.eu/GB_en/control/connectivity-indoor-units/
I guess all communication happens over R1,R2 connection, which provides power and modulated communication line.
No sorry. No plans at all.
Hi.
Would you tell me how to control it with Mqtt messages (or http get/post) ?
I’m using Node-Red for years but my knowledge on Esphome is quite limited.
Some example would be usefull.
Thanks in advance
I bought two units last year and did install one of them and it worked. For some reasons I cannot remember I removed them again and started using the cloud plugin in Home assistant.
Unfortunately that one stopped working so I thought to try and use the ESP 32 again.
Installing it and accessing the esp32 via the webinterface is working like a charm, however the AC does not seem to respond to the commands at all.
Also verbose logging doesn’t seem to get anything from the AC
20:45:39[V][panasonic_ac:245]
what should be my next step investigating this?
If your original panasonic wifi module stopped working, that might be the root cause of your problem.
I have a unit with built in Wifi which is still working fine. The problem I have in home assistant is with the home assistant panasonic plugin itself (HACS), the original Panasonic App still works so I don’t think my AC is defect in any way
Based on the very limited information you are giving it’s near impossible to say.
sorry for the fuss, it seems I was steering the wrong and unconnected ESP32 !
No props, it just a little hard to ‘see’ what’s going on at your end.
Glad you resolved the issue.